Glue up question - need advice

Hey Guys,

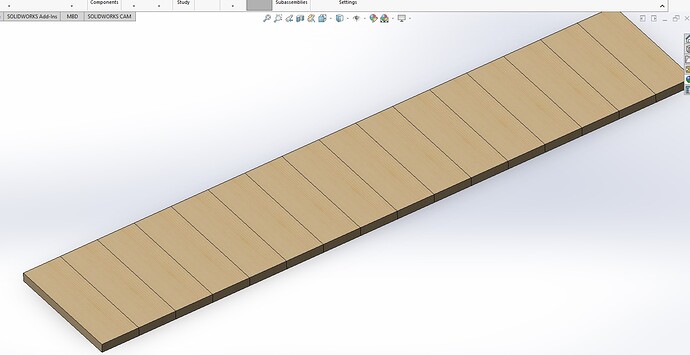
I recently started a project to make a book shelf, but the sides have been giving me some trouble. I did the glue up in a strange way. I did this for convenience, I thought it would be interesting, and look cool. My question for experienced wood workers is, is there anything inherently wrong with gluing up like this, and can it be done?

1 Like

I wouldn’t do it. If you ran that through the planer it would be a disaster. You only want to plane with the grain, not across. With that many glue joints your piece will be wavy because when you clamp it up it wont stay flat thus needing planed even more. I guess you could hand plane it but that would be difficult to get flat and the end result may be prone to warping. Build with the length of wood for strength snd stability.

I would be happy to meet with you sometime if you have more questions. We could run through your project plan real quick.

5 Likes

Also, you will run into the short grain problem. This will stand a good chance of breaking.

5 Likes

Thanks guys. Buckling during glue up has been one of my biggest problems. I also accidentally did one of the glues with the same cupping direction, causing a bow. I had to add a vertical brace to stop it from snapping under its own weight. Now that looks ugly, so I want to try and cover it with black laminate, and use that as the inside of the book shelf. I still want to make this work for some weird reason, or find some other way to do it.

1 Like

You could probably help the weakness issue by using biscuits on the joints. And you might help the glue-up issues by glueing one joint at a time. First glue pairs of boards independently. Then glue two of those pairs together and so on until you have it completed. That way you only have one joint at a time to focus on keeping flat.

I’m no expert. Just thinking about how i would approach it…

2 Likes

The grain orientation is the source of the weakness, and the joints will probably hold up better than just the regular grain. For that reason I wouldn’t expect much of any improvement from using biscuit’s.

Your idea of using laminate may actually add significant strength, but may cause other issues.

  • if done on one side alone it will virtually stop the taking-on and shedding of moisture on that face, thus increasing the likelihood/severity of seasonal bowing. Laminating both sides will address this. (For the purposes of maintaining wood stability, applying the same finish treatment to both sides of any piece that isn’t rigidly held in place by mechanical means is a very good idea.)
  • Wood movement may compromise the bond to the laminate, this is more true for a piece with only one side laminated.
  • Laminating requires a very flat surface. Please (as Jesse mentioned) do not use the planer. If used cross grain there is some marginal danger of your piece breaking (trying that on the jointer is much more dangerous, both to your piece and in the possibility of bodily harm). The main problem, however, is that rather than cutting chips, the machine will scrape/scoop whole intact fibers from the wood which will most likely jamb the ducting very quickly and may be large and light enough to escape separation in the dust collector cyclone and thus clog the filters.
    The shop bot or hand tools would be great options without the aforementioned setbacks.

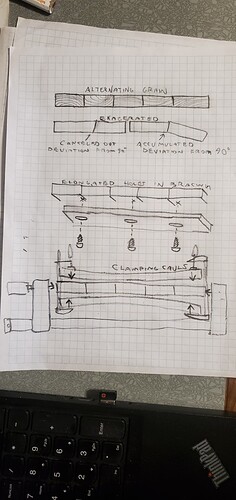
When doing glue ups of this kind, alternating the grain is a great way to minimize (not eliminate) bowing. Laying out your cuts so that they are all made with the same orientation to the blade can cancel out any compounding/accumulation of deviance from absolute 90. I would also recommend the use of clamping cauls to keep your glue ups straight, as well as limiting the number of joints you glue at one time as Sean suggested.

Using bracing may be your most viable option. Because of the likelihood of wood movement, consider using elongated holes to attach any such bracing in lieu of glue or more rigid fastening. the elongated holes with a firm, but not over-tight screws can accommodate such movement.

3 Likes

I would suggest adding a strip along the front and back edges, joined by tongue and groove, or biscuits. The wood movement may still be a problem but the spines can add vertical stability to the glue up as well as help prevent bowing. It also gives a finished look to the edges.

4 Likes

David’s idea would be the most eligant, but I would still avoid gluing the whole length.
An unglued tounge and groove held by screws or wooden pins in elongated slots would be very similar to a breadboard-end. That kind of joinery is usually done to pieces made of ghicker stock however. A captive frame could be a good option.

3 Likes

I’m pretty new to woodworking but I’d like to make a suggestion. It may not fit your original plans but you could make a frame on the left and right ends that’s strong enough to support the whole bookcase, shelves and all, and then use your glued up pieces as just an insert in a rabbet on the inside edges of the frame, or a dado on the inside of the frame to capture your glue-ups, leaving a bit of room for movement of your inserted pieces. Not totally sure if this would be strong enough to work for you, but it’s a possibility I think.

2 Likes

Thanks for all the suggestions. I am still working my way through understanding some, but I will probably apply some of these. One big problem I have now is my trying to plane it using the shop bot. However, neither side is planar or flat. So I have a little bow, and (2) non-flat surfaces. Im trying to find the best approach to clamping it tight to the shop bot bed, and removing the material correctly. I might end up just scrapping this side and starting over.

Greatly appreciated :pray:

1 Like

Are you saying to use elongated holes to prevent cracking from a kreg screw joint? I heard that is an issue with those. I have never used a kreg screw.

1 Like

Michael,

No. To prevent cracking while using keg screws, I suggest very sturdy clamping of the joint, adiquetly sized workpieces, avoiding where possible screwing near the end of a board (especially in hard/brittle woods), proper alignment (screw penetration centered on the accepting member), the correct thread type (course for softer woods and fine for harder), and strictly avoiding overtightening of the screws.

What I’m talking about is that the panel you’ve constructed may expand and contract more than an inch in normal use. As such movement occurs across the grain, any stabilizing element added with the grain oriented perpendicularly will not express any significant movement in the direction that the panel does. For this reason, such joinery (if rigidly connected by glue or statically placed screws) can literally rip itself apart in normal use.

The elongated holes allow for the screws to remain in place in one piece and travel in the other as one piece moves in relation to the other. The same concept is used in attaching solid wood table tops (subject to wood movement) to the comparatively rigid structure underneath, to bread board ends, and all sorts of woodworking with potential grain orientation conflicts. building in room for wood movement keeps the work from destroying itself.

1 Like

Interesting, I didn’t know wood could expand/contract that much. I’ve been lucky enough on most/all of my projects, to have avoided that issue. It seems like on this one however, with the current brace I have glued in, the pieces could/will eventually crack or have other issues. I am definitely going to have to start this side panel from scratch now. Im glad i can put an end to that lol.

2 Likes

It can be difficult to scrap something you’ve put a lot of work and time and care into.
You’re in there doing the work, gaining the experience, doing it right. Keep it up!

2 Likes

I appreciate it. Scrapping worked hours does suck. Learning is good though.

I have one more question. I am thinking about probably applying the framing method and trying the glue up again. Using a slot to hold the glue up at the ends. What would be the best way to join this frame to the glue up to avoid cracking? How/where would I apply the elongated holes? Just on the sides or one of the faces?

1 Like

This is an Excellent Idea in any trade or craft when we have any doubts: ask someone who has done this before! Thank you for your eagerness to make an Excellent Offer.

4 Likes

You may already know this, but for any newer makers here who do not:

Wood fibers get “fat” or “skinny” with the available moisture, but they don’t significantly “rise” or “grow taller”.

If the grain is horizontal in a panel, the panel(s) should “float” in a frame or a carcase and not be permanently glued or mechanically attached to wood oriented differently; otherwise, the work will grow vertically and rack or even destroy the piece. If the design requires such orientation, you can laminate, but you should probably laminate the entire surface.

If you don’t intend the work to last many generations, a very strong modern glue may be a good idea. If you want the work to be saved as an heirloom, consider using a natural hide glue that permits repairs in about a generation or two. Modern glues are usually stronger than the wood and moisture changes sometimes cause the beautiful wood to split in a not-always-beautiful way. Hide glues separate over time, and the joints can be re-glued with the same glue (luthiers and furniture conservators do this).

Woodworking is Excellent Working.

3 Likes

Excellent advice!

1 Like

Can you recommend a good hide glue? I’m all out of horses atm

···

On Sun, Dec 4, 2022, 08:28 Cole Haney via MakeICT Forum <noreply@talk.makeict.org> wrote:

| Cole MakeICT Member
December 4 |

  • | - |

Excellent advice!


Visit Topic or reply to this email to respond.


In Reply To

| squarenuts MakeICT Board Member, Woodshop Area Lead
November 30 |

  • | - |

The grain orientation is the source of the weakness, and the joints will probably hold up better than just the regular grain. For that reason I wouldn’t expect much of any improvement from using biscuit’s. Your idea of using laminate may actually add significant strength, but may cause other issues…


Visit Topic or reply to this email to respond.

To unsubscribe from these emails, click here.

2 Likes

This will depend upon your inclination. The short answer is probably Titebond Liquid Hide Glue, which has been favorably reviewed by many users in magazines, videos, etc.and you could stop reading now!

The longer answer (if you’re still reading) is that I like “old school” things (but that might not be your preference). You can do things as they’d be done at Old Cowtown and other museums and in traditional woodworking and musical instrument shops, or you can use modern packaging of the old stuff.

Traditional hide glue from crystals requires a glue pot and a heat source and a brush. The heat source historically has been an oil, spirit or alcohol burner that warms a vessel of water and a smaller pot within, but a modern electric coffee-mug heater (about $10 or so) such as you might use at your desk would be sufficient (we probably don’t want fires in our Excellent Make Space). The glue pot is usually smaller than you’d expect, holding about a shot’s glass volume or less of hide. I have a newer stainless steel pot and an electric warmer. I also have an antique pot. The glue traditionally is sold in “crystals” in a bag (think of the blue stuff in “Breaking Bad” to illustrate). You re-hydrate the crystals overnight in distilled water to get a protein-based glue about the consistency of maple syrup. You need additional equipment (including a brush) for this. And depending upon the quality of the maker, it can have an odor.

Well, that’s the TRADITIONAL way of doing it, if you’re inclined. Some folks still do this (or at least use the hide crystals) daily.

Unless you plan to use hide glue frequently, you may want to forego all this equipment/cost and use a read-to-use liquid hide in a bottle. This is similar to the way you probably already use polyvinyl acetate glue such as the common Titebond glue you buy in hardware and DIY stores. You may be able to source Titebond’s liquid hide glue, or search Amazon or another vendor for " Titebond Liquid Hide Glue, 8-Ounces #5013" or similar (I suggest the smaller size for smaller projects). Some professionals use PVA, some use crystal hide glue, some use liquid and some use combos.

The advantage of either type of hide glue is that unlike in a PVA joint, which is stronger than the wood, if you goof (and I goof all the time), you can use a little heat and un-goof your work without destroying any part it. But unlike PVA joints, the hide glue joints last only about 50-100 years, when another Excellent Maker will be able to easily restore the joint.

Whatever you choose, please post pictures of your Excellent Woodwork!
2 Likes