Last time I was in to powder coat some parts, there was a toaster oven by the window that I used as the old oven was over in the welding area and the new oven isn’t hooked up yet. Is the old oven functional still? Or is it broken? Also I saw the post about using the new media blast cabinet. Was that just a test? Or is it fully functional now?
Howdy David,
I bought the toaster oven to fill in while the pizza catering oven was dead, and you’re welcome to continue using it for small items. I thought the catering oven was resurrected, though. It might just be that the space is…nonexistent over where that oven usually sits.
As for the new media blast cabinet, it was reportedly amazing up until the filter announced that it’s really fond of clogging. So we’ll need to sort that out before experiencing the amazingness for ourselves.
3 Likes
I am assuming both the top and bottom elements should be working in the old oven, and it appears the bottom one is not. So it struggles to reach 300F. I believe this means the old oven is not working right.
Didn’t want to wait for the oven to cool down before crawling into it but measuring at the junction box on the back, the lower element reads open. Guessing it’s a bad connection but again too hot to crawl in to check it. I’ll try to make it back tomorrow to look at it but I have a house warming party to attend and have family in town. Then Sunday I fly out to West Virginia so somebody else might see it before I do.
I put it back together and did not tag it out as it is still somewhat functional and doesn’t pose a safety hazard.
4 Likes
I made it in to look at the old oven and was able to figure out pretty easily why it isn’t working. Unfortunately, we don’t have any lockouts big enough for the 6-50 plug so I taped a piece of paper on the controller that says not to use it.
Currently the lower element is removed and there is exposed wiring at the junction box on the back. The connection to the lower element is in bad shape, and I suspect was previously repaired. The thing with heating elements like this is that the connection has to be near perfect or it starts a snowball effect ending in the connection burning up, as this one has done. One wire is oxidized/bad at least several inches up so it isn’t long enough to be reused.
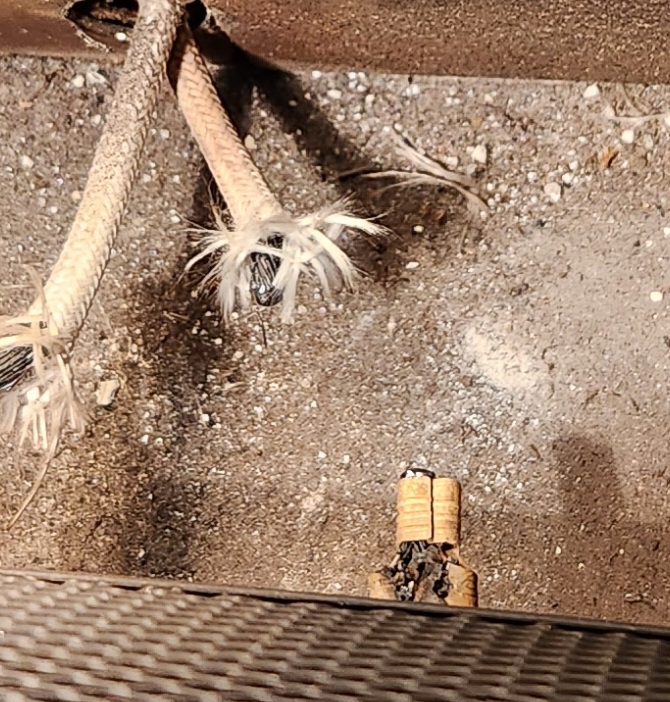
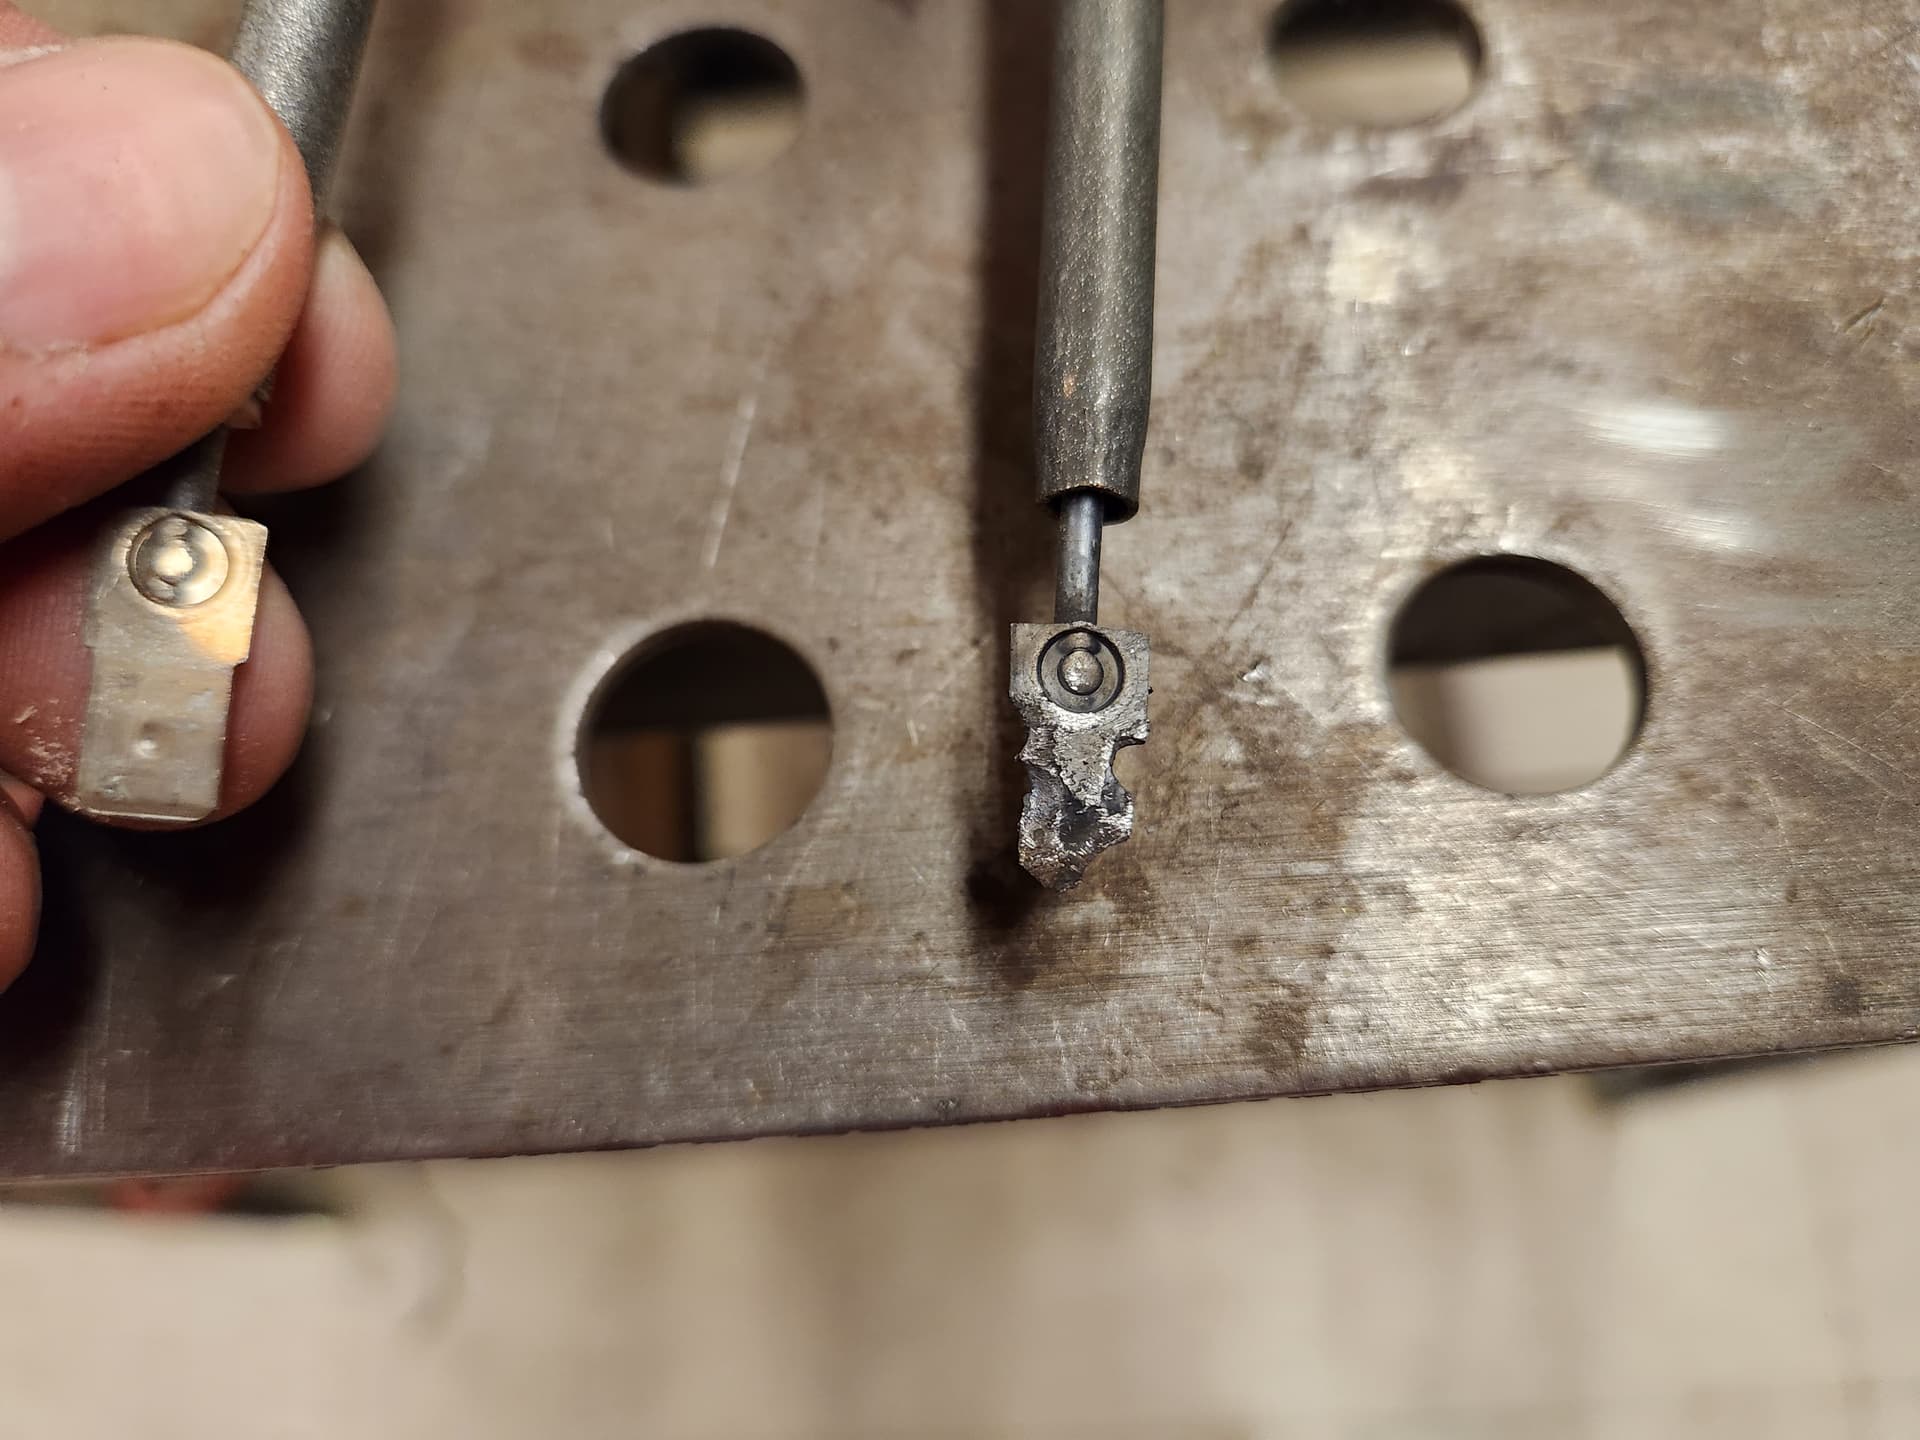
I recommend a new element and at least one new wire.
A replacement element found on Amazon of similar size and wattage is $32.
Wire can be had without connectors (Amazon.com and https://www.amazon.com/Supco-T1112-Disconnect-Temperature-Female/dp/B0071NC78C/), but because of the application, I would recommend replacement with a pre-made wire. I didn’t find a suitable wire or harness on Amazon in a quick search, but Washer Specialties should be able to provide something.
That gets the old oven operational again. I believe reinstalling the existing burner with the damaged connector will just lead to a repeat failure as the less than perfect connection becomes worse with heat and oxidation.
3 Likes
Decided to make a separate reply about the new oven.
Larry and I looked at it Friday night and I have a better understanding of what it is and what it can do now.
As configured, the three heating elements are wired in a delta configuration, so each sees 2 of the three phases and all three heat equally. The rest of the wiring supports this configuration, of course.
The simple way I see to get this working for us is as follows.
First, the existing PID may be able to be reused. It looks like the oven was meant to be used at temperatures up to 250F, but it was certified up to 400F, so it is capable of doing what we need, and the PID may not need to be reprogrammed. The existing contactors may be able to be reused, as well, though the supply side would be jumpered and each output would provide one leg of the 220 with the other leg coming directly to it. I am not a fan of this configuration as it leaves the circuit energized all the time, even when the contactor is de-energized. A better way would be to either use two contactors configured as described above, one for each leg. Or, up the size of the contactor to handle the full 30 A that the three elements in parallel would draw and use a single contactor for both legs. The PID then controls the contactor to control the temperature. It should be noted that the existing contactors are rated for a FLA of 30, so they should handle the load, but I am not a fan of sizing contactors to be “just big enough”. In the existing configuration each leg of the contactors handles 1/3 of the total current, which as configured, is about 9 A, so you can see they also designed in contactors that are oversized for the actual need.
So, it shouldn’t take much to make the new oven operational for our needs. That does not address any racking that is needed to hang parts from, and I haven’t paid enough attention when looking inside to recall what is there now.
I have not looked closely at the existing controls, though I know there are push buttons on the front. IMO, the main power should be wired as the woodshop belt sander is wired. That is, the on button energizes a contactor, which is configured to be latching. When power is removed by pressing the off button, or when the cord is unplugged, or there is an outage, the contactor is no longer able to keep itself energized and opens. When power is restored, it does not turn back on. The on button must be pressed to turn it on. I prefer this as a safety feature, though since this machine doesn’t have moving parts, it is obviously less critical.
I am traveling for work this week, but if @rustin.atkeisson and @Larry agree that this is a good course to take, I can probably assist some next weekend. With the footprint of the new oven, there is little space for the old oven and the toaster oven that @Gretchen brought in, so I think getting the new oven operational is a worthwhile endeavor. Reach out to me if you have any questions.
3 Likes
Definitely time to improve the connection to that lower heating element on the EZ bake oven. We could splice it back together for the interim, but there really needs to be a more permanent fix if we’re going to keep using it.
2 Likes
It looks like it has been fixed before, likely with standard connectors which do not take the heat very well. I’ll come in and fix it when I get back from PA tomorrow.
2 Likes
I could take it out, but I’m considering it a donation right now because don’t we need something for small items that is much faster to heat up than even the catering oven?
As for the racks, they have been migrating around that side of the hot shop, but we do have at least two.
I think it’ll be better when we get the new oven working and can re-home the old one, if that’s the plan. Right now, is kind of cramped on that side of the hot shop. I agree that having a small oven that heats up quickly is nice. The new oven should have over 6 kW of heat and is well insulated, vs the old, so hopefully it will heat up faster. Of course, it will use more energy than the toaster oven.
2 Likes
It’s definitely cramped in there-- I had to maneuver Maker Monday guests around the area carefully so they could see and listen to me talking. ![]()
Feel free to relocate the toaster oven if it’s in the way; just please make it possible to continue using it.
3 Likes
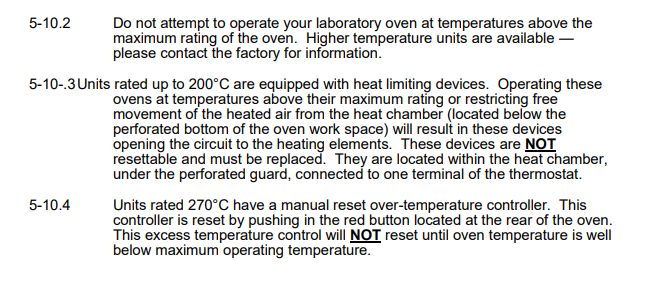
Checking out the info on the components of the oven control and the two devices that appear to be controllers (PID) are actually one temperature controller and a limit control. I am not yet sure what the limit control was being used for, and I forgot to find the model number of the oven to look it up, but since it appears to have been used for curing paint or some similar process, one might surmise that there was a need to monitor for fire. This could be done by monitoring for a runaway temperature, in which case, the limit control would latch its output causing some action to take place and remain active until overridden. I don’t know if this is a feature that we deem necessary or not. The old oven does not have this feature and we are not working with volatile compounds. So, we may omit that circuitry, depending on whether that is its actual use.
Both the limit control and the temperature controller are spec’d to work at 220/60, so they should be capable of being reused. I still need to look at the various pushbuttons on the front panel and see what they may have been used for.
Aside from the notion of leaving the oven configured as built, with the OEM recommending leaving it that way, I do not see any reason to not wire this up for use with 220/60/1. That means no phase converter needed, and no new wiring required. If memory serves me, the old oven has a 6-50 plug, and unless it was wired as dedicated welder circuit, we should have plenty of juice available at the wall.
Does anybody else know of a compelling reason not to modify the controls to be more suited to our needs?
eta: I did find a manual for a similar oven from Grieve. This seems to confirm that the limit controller is there to prevent an over temp condition. Since the oven is certified to 400F, I don’t believe this is a problem, and maybe we can/should leave it in place.
I did have a question about the toaster oven. What are you hanging parts from in it? I didn’t see a hanging rack for it or in it when I was there last.
I had a little metal grid that I slid in there, but it was very difficult to maneuver a hanger onto it without either knocking the powder off your item or burning your hand, or both. ![]()
So in some cases I’ve used a tinfoil bowl, and in some cases just hung the item from the heating element-- only tiny items.
2 Likes

If the old powder oven goes up for auction, please let me know. I built most of it, and would be interested in it. Thanks
3 Likes
I noticed there are three spools of wire sitting the three electrical box on the new oven. Is somebody already planning to do something with it? If so I’ll stop planning to rewire it for 220/1.
I discussed briefly with Rustin the other day my thoughts on the oven.
The existing contactors can be used, but we need to supply each element through one contact on them 220V, placing the three elements in parallel.
The control circuits are all 110V and there is a transformer already in place to provide 110V from the 220V supply. The temperature control can be used as is, then.
The limit controller used as an overtemp safety can probably be omitted for our use, but since we have had problems in the past with thermal runaway, it could be used to shut down the oven if it gets above a certain temp, say 500F.
I had thought that the blower might not be needed in our application, thinking it was used as a means to evacuate any fumes that might build up inside the oven. But, that doesn’t really make sense as it would also pull heat out of the oven. Noting that the elements are placed above a panel at the top of the oven, maybe this was meant to be a convection oven. (Eta: closer inspection shows that this is indeed a convention oven so the fan has to be kept)
That is to say, I think we can just supply the contactors with 220/1 and it should run. I am going to try to get over to the space tonight yet, but have company stopping by in a bit, so that may or may not happen.
1 Like
I ordered the contactor and terminal blocks to connect the new oven to 1 ph when the initial testing is complete. They should arrive this week.
2 Likes
I’ve been informed that the new oven test failed but I don’t know in what manner other than it didn’t get hot. I’ll try to stop by this weekend and diagnose that issue and then hopefully proceed with getting it ready to run on the 240/1 we intend to use it with.