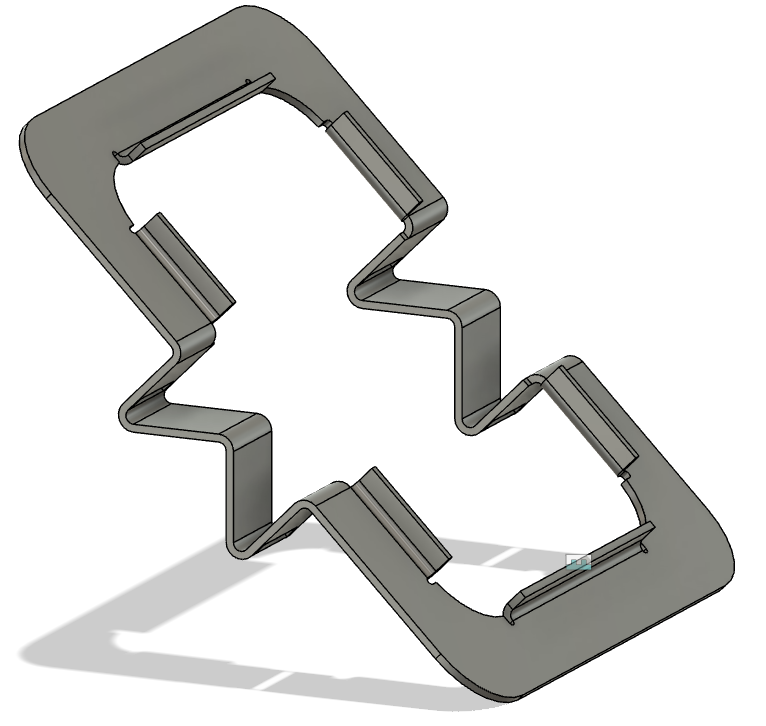
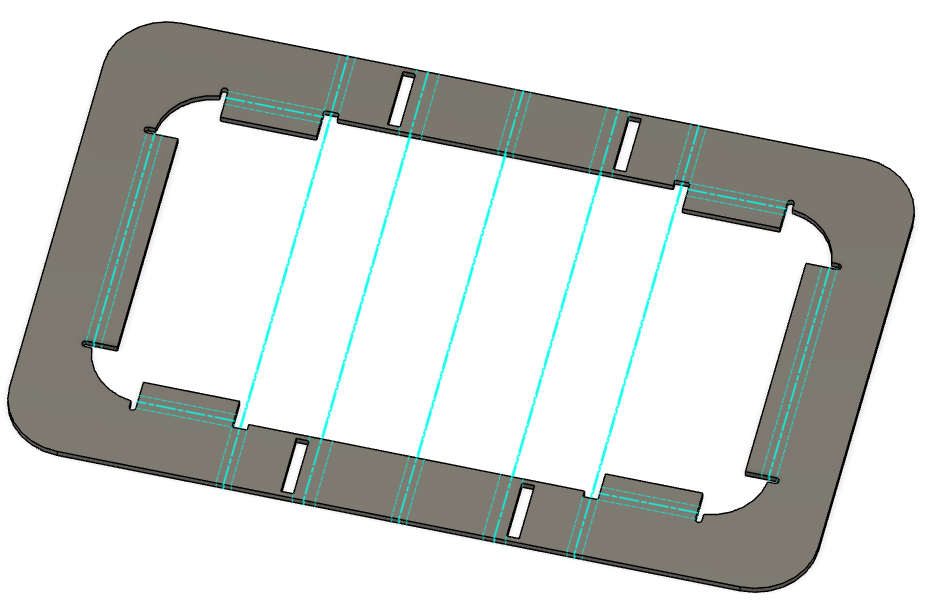
I’m prototyping a custom mounting brackets for an electronics project (CAD draft below) This will be my first sheetmetal/bending project and I’ve got a few questions:
Does my design appear to be bendable using the metalshop’s break?
Is the plasma CNC up and ready?
Does anyone have some availability to walk me through the plasma cutter workflow? I am metalshop and plasma CNC certified, but it has been quite a bit since I’ve used it last.
I certainly don’t have the answers you are looking for (looks tricky to me) but the people that do may want to know the thickness and type of material.
I dont remember what our brake looks like but this part is possible just not idea for mass production the little tabs on the inside dimension will likely need to be bent while they are a little longer then trimmed off this would also require a small enough brake die bottom piece
to get inside your square.
I dont know if ours goes down that small.?
I believe that that metal should be able to handle the bends you require be sure to calculate for setback for each bend.
If not part will be slightly bigger.
Pretty complex part, I assume this is fusion 360 sheet metal? If so it calculates the K factor. But order of operations will be very important. I’m not sure that Brake will do this. But my opinion would be to laser cut a few of these out of heavy cardstock, and bend them on the brake.
tl;dr - Not without a little work to reconfigure the 3-in-1 for this particular part.
3-in-1 machines like we have in the metal shop can be configured for box and pan work, or outside flanges, but without a segmented die, they don’t work well for internal flanges. A segmented die on a press brake, or using an apron brake, a segmented apron allows an internal flange to be made. So, as it is built, no, the brake in the metal shop won’t work.
However, a separate die could be made to straddle the existing die. The punch will do as is (mostly, more on that later) because the main part of the material would be be pushed away from it. That isn’t particularly hard to make, especially for a light part like you have. Typically a punch and die made of mild steel would be fine for light duty or low volume parts. If you want to get into making thousands, tool steel is required as the punch and die will wear out eventually.
The other part of the equation is clearance for the part. Whatever you are bending has to have room for the unbent part to be positioned and for the bent part to bend into. There is little above the die to get in the way on an open part like this. However, because this is a 3-in-1, the shear has to have a truss to keep from deflecting while shearing material. This truss can be seen going across the back side of the shear blade. Across the front is the bed of the shear that the material being sheared would rest on while being sheared. Depending on the order of operations many parts can still be bent on a 3-in-1 keeping in mind that the material can’t occupy the same space as the tool.
In the case of this part, the acute angle is hard to do on the 3-in-1 as it sits because the existing punch and die will not support bends beyond 90 degrees (or close to it). Couple that with the internal flanges and I would probably try to bend this a different way. How many do you intend to make? For a prototype, I would be inclined to make a punch and die that can be placed on the existing die and in place of the existing segmented punch. That could be made to bend up or down, depending on how you order the operations. If you think the bending is pretty close to what the final product will be, you could make dies to do all of the flanges in one stroke, and then bend the W shape in a second or second/third operation. Not terribly difficult to do, but it does require some materials and time.
As has been stated, there’s a lot to doing this part, especially with the limited tools available. For the internal flanges… I’d leave the tabs way long in order to give one enough leverage to bend them over a basic buck with the appropriate radius (or slightly smaller) machined into the edge. Put the buck and part in a vise and force the tab around the buck, probably need some hammer work to get the steel to follow the radius well.